Tuesday, November 12, 2013

Recipe: Apple Cranberry Bake

Apple Cranberry Bake

Holly's grandmother gave her this great dessert recipe several years ago.   It is simple and fast.  This would be excellent with ice cream or whipped topping.

Ingredients
3 cups apples sliced thin
2 cups uncooked cranberries
1 cup sugar
1 cup oatmeal
1 stick butter or margarine
1 cup chopped nuts (we usually use walnuts but any nut of your choosing)
1 tablespoon brown sugar

Combine apples, cranberries and sugar in a 7" by 12" pan.  Make a topping of oatmeal, butter, brown sugar and chopped nuts by mixing into a crumbly consistency.  Spread over the apple-cranberry combination.  Bake one hour in a 350 degree oven.

Serves 10 - 12 servings

Did you know that one medium sized apple counts as a 1 cup of fruit?  This is half of the daily recommended fruit quota for the average adult.   Apples really are a powerhouse of good nutrition with 4 grams of soluble fiber, immune boosting Vitamin C, and for a such a sweet snack surprisingly low calories (1).


Bibliography
1.  Jennings, K. A. (2011, Sept 11). Eating well: 6 serious health benefits of apples . Retrieved from http://www.huffingtonpost.com/eatingwell/health-benefits-of-apples_b_966110.html

Monday, November 11, 2013

Come out and see us this SATURDAY! Exclusive Social Media Flock Savings Inside!


We will be at the Harvest Fellowship Craft show in Brighton this Saturday from 9 - 2 pm.  We will be monogramming as you wait on site as well as showing off our new winter inventory including hot tater bakers, tooth fairy pillows, spare toilet paper holders, and much much more.  We will have quilt samples to look over that day as well.  If you want a sneak peek at our inventory, check out the new website at www.feelgoodfalls.com.

We can't wait to see you at the Harvest Fellowship Church Craft Show at
11401 East 160th Ave Brighton, CO 80602.  

Thursday, November 7, 2013

Guest Blogger: Clara Zolud's Silverware Caddy and Napkin Holder


Just in time for Thanksgiving dinner enjoy this elegant silverware caddy and napkin holder project adapted from California's own Clara Zolud. 

This is a quick project that would take an intermediate seamstress roughly 30 minutes per holder.  
Materials
Cut  2- 10" x 5" rectangles (for the back of the holder)
Cut 3  8.5" x 5" rectangles (two for the napkin holder, one for the silverware holder)
Be creative with your fabrics - mix and match to your heart's content!


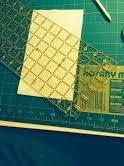
1.  Beginning with two pieces of fabric measuring 8.5" x 5" cut it a 60 degree angle lengthwise using a rotary cutter and ruler.  The easiest way to measure a 60 degree angle is to line up the 60 degree mark of your ruler with an edge of your fabric (as shown in the picture).
 
2.  Lay these two pieces right sides together and sew along the diagonal using a 1/4" seam allowance.  Turn and press.   Top stitch along the diagonal.  Don't worry about trimming the excess it will be taken care of in a later step. 

 
3.   Fold the 8 1/2" piece of fabric in half to make a 4 1/4" tall by 5" wide rectangle. Press.  Stitch smaller rectangle to the 60 degreed angled fabric to create slots for the silverware.  Measure slots for silverware to be about 1 1/2" apart. 


4.  You are going to make a fabric sandwich now.  With right sides together,  sandwich the two smaller pockets between your two backing fabrics (10" x 5").   Starting about 1/4" of an inch from the bottom sew a 1/4" seam to both sides and the top of napkin holder.   Turn and press.   When you turn you might notice the silverware pocket underneath the napkin pocket.  This is an easy fix. Just turn the fabrics again to have the pockets line up correctly. 


5.  To finish, fold raw edges under 1/4" inch from the bottom.  There is a lot of bulk now so it is easier to fold the two backing fabrics together as one unit and the pockets together as another unit.   Top stitch around entire napkin ring.


Tuesday, October 15, 2013

Tuesday Tutorial: Storage for Thread and Bobbins

We saw this idea on Kimations (a DIY blog) and couldn't help but get excited.  As any garment sewer knows, you wind up many more bobbins that you will ever use.  Using a basic golf tee, you can "attach" your bobbin and the thread together for ease in finding it when you are ready to use that color again.

Find more great ideas from Kimberly here

Thursday, October 10, 2013

Spooky Spider Cookies

Spooky Spider Cookies

Photo by Betty Crocker


You can purchase this book through barnes and noble here


We found this project in Betty Crocker's Celebrate! cookbook and thought that it was a good project to work on with your elementary or preschool aged kids.  This is a great cookbook full of fun and quick food projects to celebrate year-round. 


Supplies

1 package Black string licorice
20 orange creme-filled chocolate sandwiches cookies (Halloween Oreos) 
1 teaspoon chocolate ready-to-spread frosting
40 mini candy-coated pieces  (M&Ms)
Kitchen Shears

1. Have an adult cut using scissors the string licorice into approximately 1.5 inches.  You will need eight of these.
2. Have the child place the legs into the cookie filling, hopefully 4 pieces on each side.
3.  Give your spider spooky eyes by attaching M&Ms using chocolate frosting. You could match up colors or make a mismatch of different colors. 


Bibliography
Betty Crocker. (2004). Celebrate! A Year-Round Guide to Holiday Food and Fun . Minneapolis : General Mills.


Thursday, September 19, 2013

Tutorial Tuesday: Reusable Snack Bags

With a brand new kindergartener this year, its hard to believe how many plastic snack bags we go through in a month. Between school lunches, morning and after school snack, we go through two boxes a month.  Using fabric scraps and about 45 minutes, you can whip a cute reusable snack bag for a fraction of the price.

Ideally, you would use PUL for the inside of your snack bag so if you had leaky items they wouldn't leak into your child's backpack or lunchbox.  PUL, which stands for polyurethane laminated fabric, is a coated fabric primarily used for cloth diapers because it allows the skin to breathe while being very water resistant.  Thanks to the new cloth diapering craze, PUL is avaliable in many adorable colors and patterns and stocked nationwide at large fabric chain stores such as JoAnns.  PUL is a pricey fabric so make sure to have your JoANN's 40% off coupons ready.  For our purposes, PUL is an ideal choice because not only is it water resistant but it also easy to maintain. 


REUSABLE SNACK BAG
Supplies:
2 fabric rectangles cut to 13" x 6" (both can cotton or flannel or one can be cotton and other PUL)
4 inches of sew on velcro
Thread
Scissors
Sewing Machine
A lit bit of tissue paper (only if you use the PUL)

Step 1
Cut out your fabric rectangles.  We used a flannel polka dotted fabric and some bright pink PUL.  (HINT:  when using PUL, you can only iron on the non-shiny side.  If you apply heat the shiny side you have ruined both the PUL and possibly your iron)  Iron flat.

Step 2
With right sides together attach fabric rectangles to each other leaving a small area for turning. 


                                      Step 3
Turn and iron.  Make sure to turn excess seam allowance.  Iron flat (remember don't iron on the shiny side of the PUL) and top stitch all the way around.  When you have finished this step you should a completely finished rectangles. 

Step 4
Cut 4 inches of velcro.  We used a tan colored velcro but you can use whatever you have around.  I have seen people reuse the snaps from an outgrown onesies to be even more environmentally friendly.  The loop side is applied to the end of the long side of rectangle on the polka dotted (outside) fabric.  Apply using a straight stitch.

Step 4
Measure 4" from the bottom of the long side where you applied the loop from the velcro.  Mark with chalk or washable fabric pen.  With right sides together, fold to mark line. Straight stitch sides and turn.  The one disadvantage of the PUL is that it is difficult to feed through sewing machines.  In our example, we used a piece of tissue paper as a barrier between the PUL and the machine.  This made the
seams go a lot easier.

Step 5
After you have turned your snack bag you should see the bag and opening flap.  Apply the loop tape to the PUL side of the bag using a straight stitch.   You are finished!  Fill with goldfish, grapes, animal crackers or sandwiches.  


Saturday, September 14, 2013

Did you know we make tshirt quilts?


Did you know that we make custom quilts?  Here is a sample of scrapbook style t-shirt that we recently delivered to a little boy!   

These quilts take about 40-50 shirts and/or clothing pieces that are special.  Allow 4-6 weeks for processing.   Oversized twin quilts start at $450.